This happens because the default uninstall tool still leaves behind a few files and registry entries. So when you install a stable driver on your PC, these leftover files will cause issues with the installation. This guide will show how to uninstall GPU drivers completely using the Display Driver Installer (DDU) software. So let’s get to it.
Why Use Display Driver Uninstaller (DDU)
The default uninstaller leaves residual files on your PC. However, Display Driver Uninstaller is designed to search and remove all residual files and folders, clean up the corrupt registry entries, and remove all traces of the GPU drivers. Essentially, when you try and install a GPU driver after using DDU, it will be similar to a clean installation. While DDU is undoubtedly a great tool to use, the various options and configuration settings it offers can confuse first-time users. This is why we will be highlighting the easiest way to use DDU without causing any harm to your PC.
Things to Keep in Mind While Using DDU
While using DDU software is simple, but you’ll need to keep in mind a few things. First, ensure that your system isn’t connected to the internet. This is to ensure that Windows Update doesn’t interfere with the GPU drivers’ uninstallation. Secondly, DDU will not work on a network drive. So you’ll need to install and run it on your Windows computer. Also, it’s recommended to exclude the DDU folder from your antivirus software. It’s recommended to use DDU in the Windows Safe Mode. However, if you choose to use DDU in the Normal mode, you’ll need to repeat the entire process twice to ensure that it cleans all the files properly. Now, let’s get down to the actual process.
How to Uninstall GPU Drivers Using DDU
Step 1: Download the DDU installer located at the bottom of the Guru3D website. Pick a download location of your choice. Download DDU for Windows
Step 2: Once you’ve downloaded the installer file, unzip the file to the location of your choice. Now open the extracted folder and double-click on DDU.exe to launch the self-extraction tool.
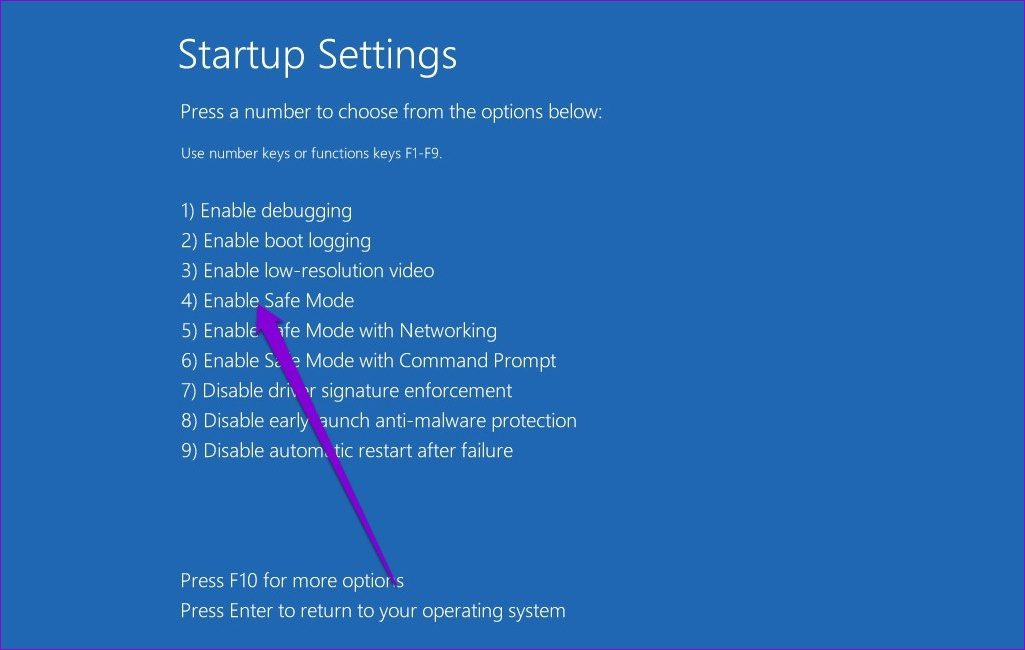
Step 3: Once the files have been extracted, you will have to reboot your system to the Safe Mode.
Step 4: Once your PC restarts into Safe mode, open the DDU folder and double-click on Display Driver Uninstaller.exe to launch it.
Step 5: In the Options window that pops up, select your preferences. However, if you wish to keep certain files or add-on software installed on your system, uncheck them from the list.
Step 6: Once you’ve made the changes as per your preferences, click on Close.
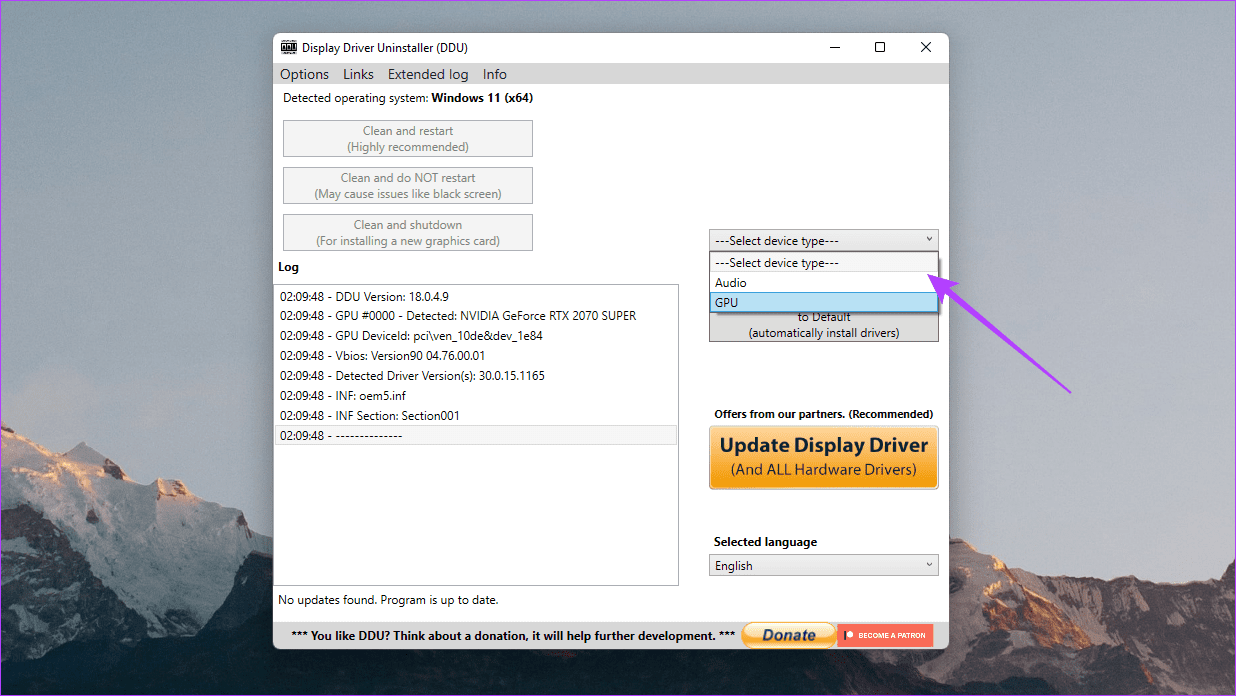
Step 7: The DDU window should now open up. On the right side, select your device type – GPU.
Step 8: Now select your GPU manufacturer – NVIDIA, AMD, or Intel
Step 9: Finally, click on Clean and restart.
And that’s it. DDU will uninstall your graphics driver, clean up the registry, remove any leftover files, and then reboot your system. Once your PC boots up, connect your PC to the internet an Windows will automatically fetch the latest stable driver.
Start Afresh
Once Windows finishes installing the GPU driver for you, you can continue using your PC as you like. However, do note that Windows does not install the latest GPU driver. Instead, it installs the version that it thinks is the most stable one. You might want to update your GPU driver later on to the latest version if you are sure it is stable now. If your computer has NVIDIA’s graphics, you can check our guide on installing and updating NVIDIA’s drivers without GeForce Experience. The above article may contain affiliate links which help support Guiding Tech. However, it does not affect our editorial integrity. The content remains unbiased and authentic.


